Showing posts with label hull assembly. Show all posts

Wednesday, March 30, 2011

Fitting the seat tops

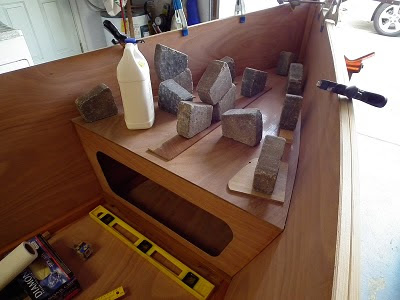
Aaargh I'm really doing a bad job keeping this blog current.  Boat building is inching along.  Finally got to fit and glue the seat tops.  Having the boat on it's trailer from early on has been a great help.  First of all the boat can be moved around easily but also the trailer is a rigid frame that allows for easy leveling of the boat.  It came in handy while fitting the seat tops as I was able to square the boat up using the trailer frame as a strong back.

Inside of forward buoyancy tank epoxy coated and ready for seat top.

Rear tank epoxy coated and ready to be sealed

Mid seat shaping to hull side contour.  I used the same basic procedure for the front and rear seat tops.  The front was pretty easy but the rear took a while because of the notches needed for the transom corner framing.

Butting the oversize seat top up against the hull side and transferring the hull contour by using a small scrap of ply as a guide.  Once one side is done repeat on other side but sneak up on it to not cut the seat too short.

  I levelled the dagger board case top fore and aft by adjusting the trailer tongue jack.  Once the dagger board case top was level I clamped the seat top to it and levelled it at the hull side then drew a pencil line on the hull side under the seat top.  This line is a guide to gluing on the mid seat side cleats.

Ziplock filled with thickened epoxy depositing a nice fat bead onto seat top supports.

Took more weight than I thought to get the seat top to lay flat and in contact with all of the supports.

Front seat top being glued down.

Overview of the mess.

Total time to date 270hrs


Sunday, December 12, 2010

Cleaning up the bottom

Now that the bottom is on, we turned the boat over again and trimmed the bottom to the hull sides then rounded the chine to a nice radius.  The hull is starting to get a bit to heavy for Kristi to turn over in the air so we carry it into the yard set it in the grass then roll.  It's still pretty easy for the two of us to carry around.  The bottom trimming and rounding took a good bit longer than planned, yeah I know what's new.  First of all, I could not find my laminate trimming bit for the router so instead of stopping and going to the store for another one I decided to just man up and hand plane the bottom to size.  In retrospect this was a mistake as it took way to long.  And by the time I got the the last mm, where you have to be a bit careful to not gouge the hull sides, serious fatigue was setting in.  Fortunately Sanding Queen (queue ABBA) had just gotten back from a Christmas party (no spouses yey) so she was able to come in and help finish the job :-)


You can dance, you can jive, having the time of your life
See that girl, watch that scene, dig in the sanding queen, oh yeah.....

Hull bottom trimmed, sanded and ready for epoxy coat.

Closeup of radiused chine.  I find it tricky to hand sand a nice even radius in solid wood but it's a lot easier in ply as the layers act like gages.  If the lines formed by the ply layers are parallel and not wavy then the radius is reasonably constant.

First coat of epoxy is on.  Only one coat for now.  I wanted to have the wood sealed so that it would be ding resistant. Plus I can work on the boat outside and not worry about a lttle water splashning on it.  The last two coats will go on at the same time as the chines get fiberglass tape.

Total time to date: 225hrs

Sunday, December 5, 2010

The bottom goes on

The bottom panel butt splice epoxy cured overnight.  Today we cut and installed the bottom panel but first I had to cut limber holes in two bulkheads.

Clamped on a piece of scrap ply with a pilot hole in it to guide the hole saw.

Cutting limber hole.

All done, just a bit of sanding to clean it up.

Marking out the hull profile on the bottom panel.

Taking a break while the hull bottom outline is lofted.

Hull bottom cut out.

Hull and bottom ready for dry fit.

We propped the bottom up over the hull before applying the epoxy in an attempt to keep as much of the goo from getting all over the bottom, while positioning.  We started screwing down at the bow and proceeded to the stern removing the supports as we went.  This worked well.

Bottom is on.

Excess epoxy squozeout got cleaned up to minimize sanding later.

Through the transom.

A glimpse into the skunk..er..gerbilworks.

Total time to date:  217hrs

Saturday, December 4, 2010

Craack!

So you remember that little crack that formed in one of the chinelogs as we were assembling the hull?  Well it got bigger.  I think it happened as we were flipping the hull, since it gets stressed in different directions when you do that.  This crack growing may actually be a good thing as it allowed me to fix a little unfairness that crept into the bow area.  The side of the hull that had the intact chinelog had a bit of a kink where the stem ended and the chinelog began but the cracked side is beautifully fair.  Since I like the fair side better I induced the same crack in the intact chinelog and now both sides look great.  A big dollop of epoxy makes it all OK.

All of this is a result of me thinking I was being clever and not following the plans.  Michael Storer, the designer, specifies that the chinelogs should end 50mm short of the bow-end of the hull sides.  But I noticed that the stem is significantly less deep than that so you end up with a gap.  Silly designer, says I, I'm going to extend the chinelogs all the way to the stem and make it all pretty.  Well, if you do that what happens is that the two chinelog ends hit each other as you bend the hull sides around the first bulkhead, doh! 
I took the pull saw and viciously hacked away chunks of the offending chine logs.  THAT will teach them and nobody will see the butchery since all this is inside the floatation chamber.  The hull went together beautifully.  Except now with the chinelogs not touching each other the hull sides are not quite fair just aft of the bow and the gap between the chinelogs allowed the chinelog to split away from the hull side.  How much do you want to bet that if I had cut the chinelogs 50mm from the hull end, as instructed, they would have come together and just touched thereby preventing that slightly unfair hollow and since they would be touching each other they could not separate from the ply.  Silly builder. 
BTW, the chinelog that pulled away from the hull side was a secondary joint since that hull side was epoxy coated all over, without masking the joint areas.  The epoxy was well sanded with 60 grit, in the glue joint.  It looks like it's mostly the wood and not the epoxy that failed but it's a little hard to tell.  The side which did not fail had the joint areas masked before epoxy coating so that joint is wood to wood.  Coincidence or is that side a stronger joint?  You decide.


The chinelog on the left has separated from the hull side while the one on the right has only a bit of a crack. It is mostly hanging on but is causing an unfair hollow just aft of the stem.


So the solution is to separate the other chinelog from the hull side by the same amount.  I used a small steel scraper, as a wedge, to shear the cedar away from the hull side.


I taped the underside with some packing tape to form a dam and filled all of the cracks with slightly thickend epoxy.  It's ugly but stout.


Total time to date: 207hrs

Saturday, November 27, 2010

Gluing the bulkheads

We left the hull dry assembled overnight and began the epoxying of all the bulkheads this morning.  Rather than working hunched over on the floor we elevated the hull onto a sawhorse and a folding table.  This worked well and gave us easy access all around the bulkheads.  I noticed that a couple of the bulkheads somehow, despite all our precautions, crept up by about 1/8 of an inch during the dry fit.  This is not a big deal but it opened up the gap between the chinelog and bulkhead cutout making it look bad.  Because of the wedge shape of the bulkheads they really want to move up.  We repositioned the misbehaving bulkheads and screwed them back in place using new screw holes.  To epoxy everything together we started at the stem and removed the stem then each bulkhead, one at a time, smeared it with thickened epoxy then slid and screwed it back in place.  I was worried that this would be a nightmare with the hull sides spronging apart while I'm trying to drive screws into place with the screw gun slipping out of my epoxy coated hands.  It turned out much less traumatic than that.  Removing any one bulkhead does not cause the hull sides to move significantly and when they did, like at the transom, the ratchet straps prevented significant springback.


Hull blocked up off the floor, ready for epoxy.


Still have a couple ratchet straps from chine to chine to keep the hull sides from springing back too far when each bulkhead is removed for epoxy application.  This was not absolutely necessary but I was worried that some of the screws would strip out going back into the same holes in the soft cedar


My theory that a lot of the stress at the stem is relieved once all of the bulkheads are in place is proven by this picture.  I was pleasantly surprised that the hull sides did not spring far apart once the screws were removed.  In the picture above, the red clamp is holding the gunwhales from spreading further but there is very little tension on it.  The bottom of the stem is completely unclamped!  The two blue clamps are just holding the gunwhales to the hull sides.


Today Clamp Girl became Epoxy Vixen and helped tremendously by taping, mixing, squozing and generally getting into the thick of the assembly. 


The hull sides wanted to spring apart a bit too much for my liking, once the transom was unscrewed so we used two ratchet straps, top and bottom to keep things under control.

Total time to date: 201hrs

Friday, November 26, 2010

3D!

Today, the hull got dry fitted in preparation for final assembly.  It was lots of fun seeing it take shape for the first time.  Kristi, my wife, spent most of the day acting as clamp girl which was a huge help.  The last thing I had to do before the assembly was to cut chinelog clearance notches in the bulkheads.  This was a bitchy little job as the angles get a bit crazy.  The cuts are not perfect but an epoxy fillet will hide the sins.  I used an offcut from the chinelog as a template for the cuts.  Since the bulkhead sides are bevelled the cut has to follow that bevel.
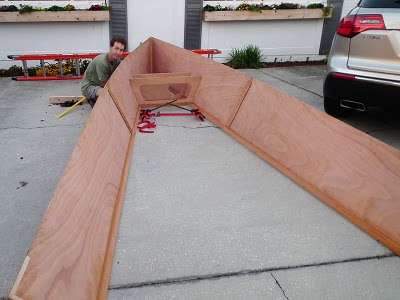

Using chinelog offcut to mark bulkhead.


Clamp Girl preparing to fit stem.


We found it much easier to attach the hull sides to the stem with the hull sides spread apart to the stem angle.  Had to move outside to get the room.


Stem screwed on and bulkheads ready to go.


First bulkhead is in.  It required considerable force to curve the hull sides around it.  We first screwed the bulkhead to one hull side then brought the hull sides together by using a ratchet strap from chine to chine.  We clamped a clamp to each chine and then attached the ratchet strap hook to each clamp.  This worked extremely well and allowed the hull sides to be slowly brought together with little drama except for some scary creaking sounds from the stem.  Some folks reported having trouble with the hull sides cracking a bit just aft of the stem during this procedure so we left two clamps around the base of the stem to help the screws hold things together.  We got a small crack in the first two inches of one chinelog but it closed back up once the rest of the bulkheads were installed.  A bit of epoxy will take care of that. 


Screwing bulkheads in.


You can see the clamps and ratchet strap used to pull the hull sides around the second bulkhead.


The bulkhead bevels specified in the plans are dead on perfect.  I have to touch up one bevel but otherwise they all fit great.


It is amazing to watch the flat ply take on such a graceful curve once persuaded around the bulkheads.


We ran out of daylight but the dry fit is complete.


Transom required the clamp and ratchet strap treatment.

Total time to date: 195hrs